Contents
Did you know that adjusting the tension in your garage door’s extension springs can have a substantial impact on its operation? It’s an essential step often overlooked by many DIY enthusiasts. By following these vital tips and tricks, you can tackle common garage door issues effectively and save on repair costs. From safety precautions to troubleshooting sensor problems, this guide will equip you with the knowledge needed to handle your garage door maintenance like a pro.
Key Takeaways
- Safety precautions like disconnecting power and using the correct tools are crucial.
- Inspect for rust, wear, and balance issues before attempting repairs.
- Regular cleaning and lubrication can prevent rust and ensure smooth operation.
- Address sensor alignment and common problems like track debris and worn springs.
- Test the door after adjustments to ensure proper functioning.
Safety First
Before starting any DIY garage door repair, make sure you are safe by following these essential precautions. Safety precautions are important when working on your garage door to prevent accidents and injuries. Here are some DIY techniques to guarantee a safe repair process:
Disconnect the Power: Always start by disconnecting the power to your garage door opener. This step is vital to avoid any accidental activation of the door while you’re working on it.
Use Proper Tools: Make sure to use the right tools for the job. Using incorrect tools can’t only make the repair more challenging but also increase the risk of accidents.
Wear Protective Gear: Safety glasses, gloves, and closed-toe shoes are a must when working on your garage door. These items will protect you from any debris or sharp edges.
Read the Manual: Before beginning any repair, carefully read the manufacturer’s manual for your garage door. Understanding how your specific door works can help you avoid unnecessary mistakes.
Work with a Partner: Having someone assist you during the repair can be valuable. They can help hold parts in place, hand you tools, or provide an extra set of eyes on the situation.
Tools You’ll Need
To successfully tackle your DIY garage door repair, make sure you have the following essential tools ready for the job. Proper tool organization is key to guarantee you can efficiently complete the repair while staying safe. Start by gathering a set of basic tools such as a hammer, screwdriver set, pliers, adjustable wrench, and a tape measure. These tools will come in handy for most garage door repairs.
In addition to the basic tools, you’ll need specific tools for garage door repairs. A socket set, a level, and a rubber mallet will help you with more intricate tasks. Make sure to have a ladder or step stool available to reach high areas safely. Safety precautions are vital, so don’t forget to wear safety goggles and work gloves to protect your eyes and hands.
For more complex repairs, consider investing in a garage door opener reinforcement bracket, winding bars for torsion spring adjustments, and a clamp for holding the door in place during repairs. Having these tools readily available will save you time and make the repair process smoother.
Inspecting the Door
Start by visually inspecting your garage door for any signs of wear and tear. Look out for rust spots, especially on metal components, as they can lead to corrosion and compromise the door’s integrity.
Check the balance of the door by manually lifting it halfway to see if it stays in place or moves erratically.
Visual Inspection Techniques
Conduct a thorough visual inspection of the garage door to identify any visible signs of damage or wear. Start by examining the door panels, hinges, rollers, and springs for any cracks, dents, or rust. Check the weatherstripping at the bottom of the door for wear and tear, guaranteeing a proper seal. Look for loose screws or bolts that may need tightening to maintain the door’s security.
Inspect the tracks on both sides of the door for debris or obstructions that could affect the door’s movement. Make sure the tracks are properly aligned and free of bends or damage. Check the cables for fraying or wear and ensure they’re securely attached to the door.
Additionally, during your visual inspection, take note of any unusual sounds or jerky movements when opening or closing the door. These could indicate underlying issues that require attention.
Checking for Rust
Begin by visually examining the garage door for any signs of rust, focusing on areas such as the door panels, hinges, rollers, and springs. Rust can weaken the structural integrity of the door and affect its smooth operation.
To prevent rust, regularly clean the door with mild detergent and water, and make sure it’s completely dry before applying a silicone-based lubricant to protect metal parts.
If you spot rust during your inspection, it’s essential to address it promptly to prevent further damage. Use a wire brush to scrub off the rust, then apply a rust converter to stop its progression. After the converter has dried, you can paint over the affected areas with a rust-inhibiting primer and a metal-specific paint to provide a protective layer.
Regular maintenance is key to preventing rust from forming on your garage door. Inspecting and addressing any signs of rust early can extend the lifespan of your door and keep it functioning smoothly.
Assessing Balance Issues
To evaluate balance issues with your garage door, carefully inspect the alignment and movement of the door when manually operated. Start by lifting the door halfway open and letting go. A well-balanced door should stay in place, while an unbalanced one might rise or fall. This test helps determine if the springs need adjustment. Next, close the door and disconnect the automatic opener. Lift the door manually; it should move smoothly without much effort. Any sticking points or jerky movements could indicate balance problems. Inspect the cables for fraying or wear, as these can affect the door’s balance. Regular maintenance, such as lubricating moving parts and tightening loose hardware, can prevent balance issues. Refer to the table below for a summary of DIY repair and troubleshooting techniques for evaluating balance problems in your garage door.
| Evaluation Step | Action |
|---|---|
| Door Halfway Test | Lift door halfway; observe movement. |
| Manual Operation Test | Lift the door halfway; observe movement. |
| Cable Inspection | Check cables for wear or fraying. |
| Maintenance | Regular lubrication and hardware checks. |
Lubrication Techniques
Proper lubrication is crucial for maintaining the smooth operation of your garage door. Regular lubrication offers various benefits, such as enhancing performance, preventing wear and tear, and prolonging the lifespan of your door components.
To guarantee your garage door stays in peak condition, follow these lubrication techniques:
Select the Right Lubricant: Use a silicone-based lubricant specifically designed for garage doors. Avoid using grease or oil-based products as they can attract dirt and cause buildup.
Apply Lubricant to Moving Parts: Focus on applying lubricant to the rollers, hinges, springs, and tracks. Be generous but not excessive; a light coating is usually sufficient to reduce friction.
Wipe Off Excess Lubricant: After applying the lubricant, wipe off any excess with a clean cloth. This prevents the accumulation of debris that could impede the door’s movement.
Schedule Regular Maintenance: Make lubricating your garage door part of your regular maintenance routine. Aim to lubricate the moving parts at least twice a year or more frequently if you notice any signs of sticking or grinding noises.
Adjusting Spring Tension
Selecting the appropriate lubricant is important for ensuring the smooth operation of your garage door; now, let’s address adjusting spring tension.
Proper spring maintenance is essential for the best functioning of your garage door. However, adjusting spring tension can be risky if not done correctly.
Here are some essential safety precautions and steps to adjust spring tension safely.
Safety First: Before starting, make sure that the door is closed and disconnect the garage door opener to prevent any accidents.
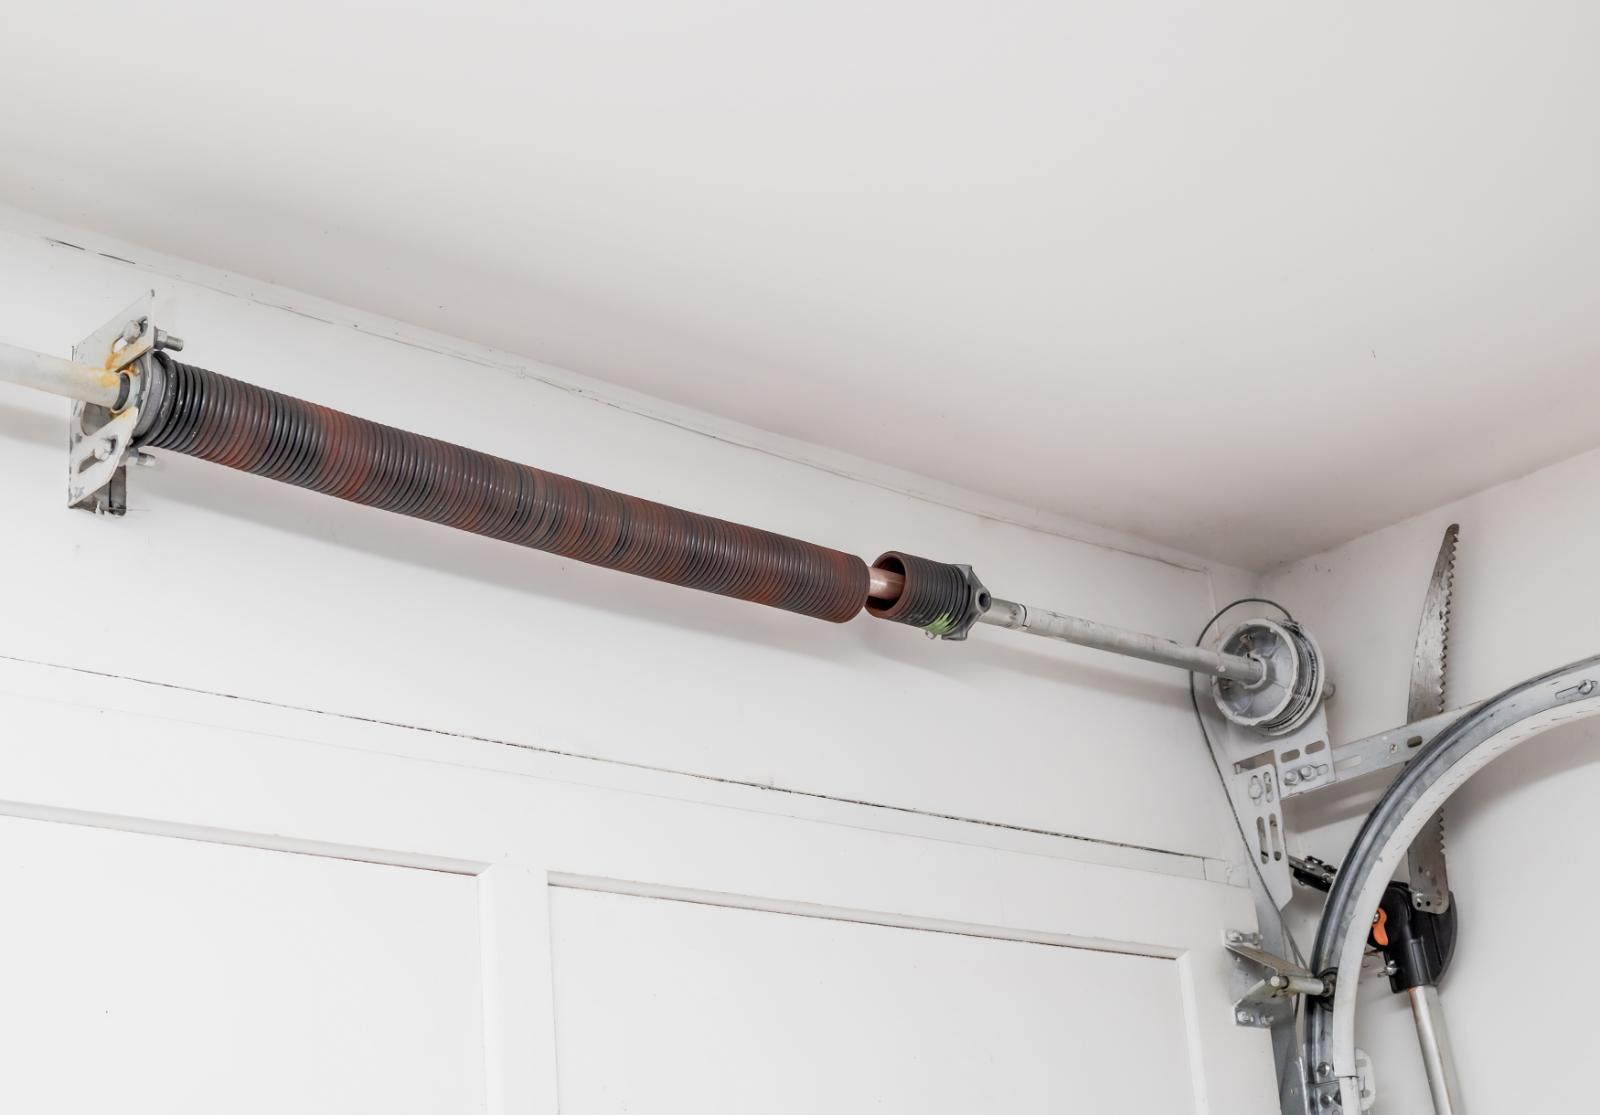
Identify the Springs: Locate the torsion springs above the door or the extension springs on the sides. Use winding bars for torsion springs.
Adjusting Torsion Springs: Insert the winding bars into the winding cone of the torsion spring. Turn the bar to adjust the tension. Make small adjustments and test the door balance.
Adjusting Extension Springs: For extension springs, pull the safety cable through the spring to prevent injuries if the spring breaks. Adjust the tension by moving the S-hook to a different hole.
Testing: After adjusting the tension, operate the door manually to check for balance and smooth operation.
Fixing Sensor Issues
To address sensor issues with your garage door, start by checking the alignment of the sensors to make sure they’re facing each other directly. If the sensors are misaligned, adjust them until the indicator lights show they’re properly aligned.
Troubleshooting sensor problems may involve cleaning the sensors, checking for obstructions, or examining the wiring for any loose connections.
Sensor Alignment Tips
Make sure the garage door sensors are properly aligned to prevent any interference with the door’s operation. Incorrect alignment can lead to malfunctions, causing the door not to close properly.
Follow these steps to align the sensors correctly:
Visual Inspection: Check if the sensors are facing each other directly and aren’t obstructed by any debris.
Adjustment: Use a level to confirm both sensors are at the same height; adjust them if needed to align perfectly.
Secure Mounting: Ensure the sensors are firmly mounted to prevent any accidental misalignment.
Test Operation: After aligning the sensors, test the garage door to see if it closes smoothly without any interruptions.
Troubleshooting Sensor Problems
Follow these troubleshooting steps to fix any issues affecting your garage door sensors and ensure that sensor problems are promptly addressed.
To begin, make sure that the sensors are properly aligned and facing each other. If the sensors are misaligned, adjust them until the indicator lights are solid.
Next, check for any obstructions blocking the sensor’s path, such as dirt or debris, and clean the sensor lenses with a soft cloth.
If the sensors are clean and aligned but still do not function, consider sensor calibration. For specific calibration instructions, refer to your manufacturer’s manual.
Additionally, signal interference from other electronic devices can disturb sensor communication. Keep devices like Wi-Fi routers away from the sensors to prevent interference.
Regular maintenance tips include checking the sensor wiring for any damage and ensuring the sensors are securely mounted.
Troubleshooting Common Problems
Identify the source of the issue by observing any unusual sounds or movements when your garage door is in operation. Some DIY techniques and maintenance tips can help you troubleshoot common garage door problems effectively.
Here’s a step-by-step guide to help you pinpoint and potentially resolve these issues:
Check the Tracks: Inspect the tracks on both sides of the door for any debris or obstructions. Use a level to make sure they’re aligned correctly.
Examine the Springs: Look at the torsion or extension springs for signs of wear and tear. If they appear damaged or broken, it’s crucial to replace them promptly.
Inspect the Rollers: Check the rollers for any damage or if they’ve come off the tracks. Lubricate them with a silicone-based product to guarantee smooth operation.
Test the Opener: Verify that the garage door opener is functioning correctly by testing it with the wall switch and remote control. Replace batteries if needed and make sure the sensors are aligned properly.
Review
DIY garage door repair can be a fulfilling project if done safely and correctly. Keep in mind, safety should always be the top priority like a vigilant guardian.
By following these crucial tips and tricks, using the right tools, and regularly maintaining your garage door, you can guarantee smooth operation and prolong its lifespan.
So, roll up your sleeves, tackle those repairs, and watch your garage door function like a well-oiled machine!


