Contents
When it comes to DIY strategies for garage door repair, did you know that simple maintenance tasks can prevent major malfunctions and save you money in the long run? From aligning sensors to troubleshooting common issues, there are various steps you can take to keep your garage door in top shape. By following some key guidelines and using the right tools, you can tackle many repairs on your own. But what specific techniques can you employ to ensure your garage door operates smoothly and safely? Let’s explore together.
Key Takeaways
- Tighten hardware regularly to ensure secure operation.
- Lubricate moving parts every six months for smooth functionality.
- Align sensors properly for efficient sensor performance.
- Test door balance periodically to detect issues early.
- Replace damaged weatherstripping to protect the garage.
Safety Precautions
Before attempting any DIY garage door repairs, always prioritize safety by following these essential precautions. Safety gear is a critical aspect when working on your garage door. Make sure to wear protective equipment such as gloves, safety glasses, and sturdy shoes to prevent any injuries. The gloves will protect your hands from sharp edges or pinching points, while safety glasses will shield your eyes from debris or small particles that may fall during the repair process. Sturdy shoes with non-slip soles are important to maintain a good grip and avoid any accidents while working on the garage door.
In addition to safety gear, having an emergency plan in place is vital. Before starting any repair work, make sure that you have a clear understanding of what to do in case of an emergency. Identify the emergency release mechanism on your garage door opener and learn how to use it. This will allow you to manually open the door in case of a power outage or malfunction. It’s also advisable to have a first aid kit nearby in case of minor injuries.
Tools Needed
To effectively tackle your garage door repair project, having the right tools is essential. Essential repair tools like wrenches, pliers, and screwdrivers will be your go-to companions.
Make sure you’re equipped with the necessary tools to guarantee a smooth and successful repair process.
Essential Repair Tools
You’ll need a set of essential repair tools to tackle any garage door issues that may arise effectively. To start, make sure you have a sturdy ladder for reaching high areas safely.
A socket wrench set with both metric and standard sizes is vital for loosening and tightening nuts and bolts during repair. Additionally, having a set of screwdrivers with various head types will help you tackle different screws around your garage door.
For maintenance tips, keeping a can of lubricant specifically designed for garage doors is important to guarantee smooth operation. Regularly applying this lubricant to hinges, rollers, and tracks can prevent wear and tear.
You should also have a level on hand to ensure your garage door is properly aligned, as this can impact its functionality. By having these essential tools ready, you can confidently handle repair techniques and perform routine maintenance to keep your garage door in top condition.
Safety Precautions to Consider
Make sure you have the necessary safety equipment, such as safety glasses, work gloves, and closed-toe shoes, before starting any garage door repair work. Safety guidelines are essential to follow to prevent accidents.
Always disconnect the power to the garage door opener to avoid any unexpected movements while working on the door. Remember to never place your hands or tools near the door springs, as they’re under high tension and can cause serious injuries if mishandled.
When it comes to repair techniques, make certain that you’re familiar with the garage door system and how it operates. DIY tips suggest regularly inspecting the door’s tracks, rollers, and hinges for any signs of wear and tear.
Proper maintenance advice includes lubricating moving parts to keep the door functioning smoothly and prevent premature wear.
Step-By-Step Repair Guide
Begin your garage door repair by gathering the essential tools needed for the job, including a wrench set, pliers, screwdrivers, and a level. These tools will be vital for various repair tasks, such as DIY spring replacement and troubleshooting remote issues.
When tackling a DIY spring replacement, remember to prioritize safety. Make sure the door is closed and disconnect the power source to avoid accidents. Using the proper tools and following safety tips will help you successfully replace the springs.
For remote issues, start by checking the batteries and connections. If the problem persists, try reprogramming the remote following the manufacturer’s instructions. A level can come in handy to ensure the door is balanced correctly after any repairs.
Inspect Tracks
When checking the tracks of your garage door, start by making sure they’re properly aligned to prevent any issues with the door’s movement.
Tighten any loose hardware you find along the tracks to maintain stability and safety.
It’s also important to clean any debris that may have accumulated on the tracks to prevent obstruction and ensure smooth operation.
Track Alignment Check
Make sure that the garage door tracks are properly aligned by visually inspecting them for any signs of misalignment or damage. To guarantee smooth operation, conduct regular track maintenance to prevent issues.
Start by examining the tracks for gaps between the rollers and the rails or any bends or dents that could hinder the door’s movement. If you spot any misalignment, use a rubber mallet to gently tap the track back into place. DIY alignment is achievable by loosening the track screws, adjusting the position, and then tightening the screws back up.
Additionally, lubricate the tracks with a silicone-based spray to reduce friction and promote fluid motion. As part of your troubleshooting guide, check for loose hardware that could impact the alignment.
Tighten Loose Hardware
Inspect the garage door tracks for any loose hardware that may be affecting the alignment of the door. Start by examining the bolts and screws that secure the tracks to the wall and ceiling. Use a wrench or screwdriver to tighten any loose hardware you find.
Make sure to check the rollers and hinges for any signs of wear and tear, replacing them if necessary to guarantee smooth operation.
To prevent rust and corrosion on the hardware, consider applying rust prevention techniques such as using a rust-resistant lubricant. This won’t only extend the lifespan of the hardware but also reduce noise during operation.
Additionally, implementing weatherproofing solutions like sealing gaps around the tracks can help keep out moisture and debris, further safeguarding the hardware.
Ensure all hardware is securely tightened to enhance the security of your garage door. This not only prevents potential safety hazards but also deters intruders.
Clean Track Debris
Clearing track debris is vital to maintaining the smooth operation of your garage door. Regularly inspect the tracks for any debris buildup to guarantee your door moves effortlessly.
Begin by using a sturdy ladder to reach the tracks safely. Then, with a clean cloth or brush, remove any dirt, leaves, or cobwebs that may be obstructing the track. Pay close attention to the rollers and hinges, making sure they’re free from debris that could affect their movement.
As part of your DIY maintenance routine, track cleaning plays an essential role in preventing track misalignment. When debris accumulates in the tracks, it can cause the door to become off-balance, leading to operational issues. By keeping the tracks clean, you not only support proper track alignment but also extend the lifespan of your garage door system.
Tighten Hardware
To ensure the effective functioning of your garage door, it’s important to regularly tighten all the hardware components, such as bolts, screws, and brackets. Over time, the constant movement of the garage door can cause these hardware elements to become loose, potentially leading to operational issues. By implementing simple DIY strategies for hardware maintenance, you can make sure that your garage door operates smoothly and securely.
Begin by examining all the visible hardware on your garage door, including hinges, brackets, tracks, and roller brackets. Using a socket wrench or the appropriate tool, carefully tighten any loose bolts or screws that you encounter. Pay close attention to the track brackets and roller brackets, as these are essential components for the door’s stability.
Regularly tightening the hardware prevents potential malfunctions and contributes to rust prevention. Rust can weaken the hardware over time, leading to more severe issues down the line. By maintaining the hardware with simple DIY solutions, such as tightening and potentially applying rust-resistant coatings, you can prolong the lifespan of your garage door and keep it functioning at its best.
Lubricate Moving Parts
Regularly lubricating the moving parts of your garage door is crucial to guaranteeing smooth operation and preventing unnecessary wear and tear on the components. By following a simple maintenance routine, you can prolong the lifespan of your garage door and keep it operating quietly and efficiently. Here’s a table outlining the benefits of lubricating your garage door’s moving parts:
| Benefits | Description |
|---|---|
| Rust prevention | Lubrication creates a protective barrier against moisture, preventing rust. |
| Maintenance | Regular lubrication reduces friction, minimizing the need for repairs. |
| Noise reduction | Proper lubrication helps eliminate squeaks and noisy operation. |
| Performance | Improved lubrication results in smoother operation and enhanced performance. |
To achieve these advantages, use a silicone-based or lithium-based lubricant specifically designed for garage doors. Apply the lubricant to the following components every six months or as needed:
- Hinges
- Rollers
- Tracks
- Springs
Remember to wipe off any excess lubricant to prevent buildup. By incorporating lubricating the moving parts into your garage door maintenance routine, you can ensure a quieter, smoother, and more durable operation for years to come.
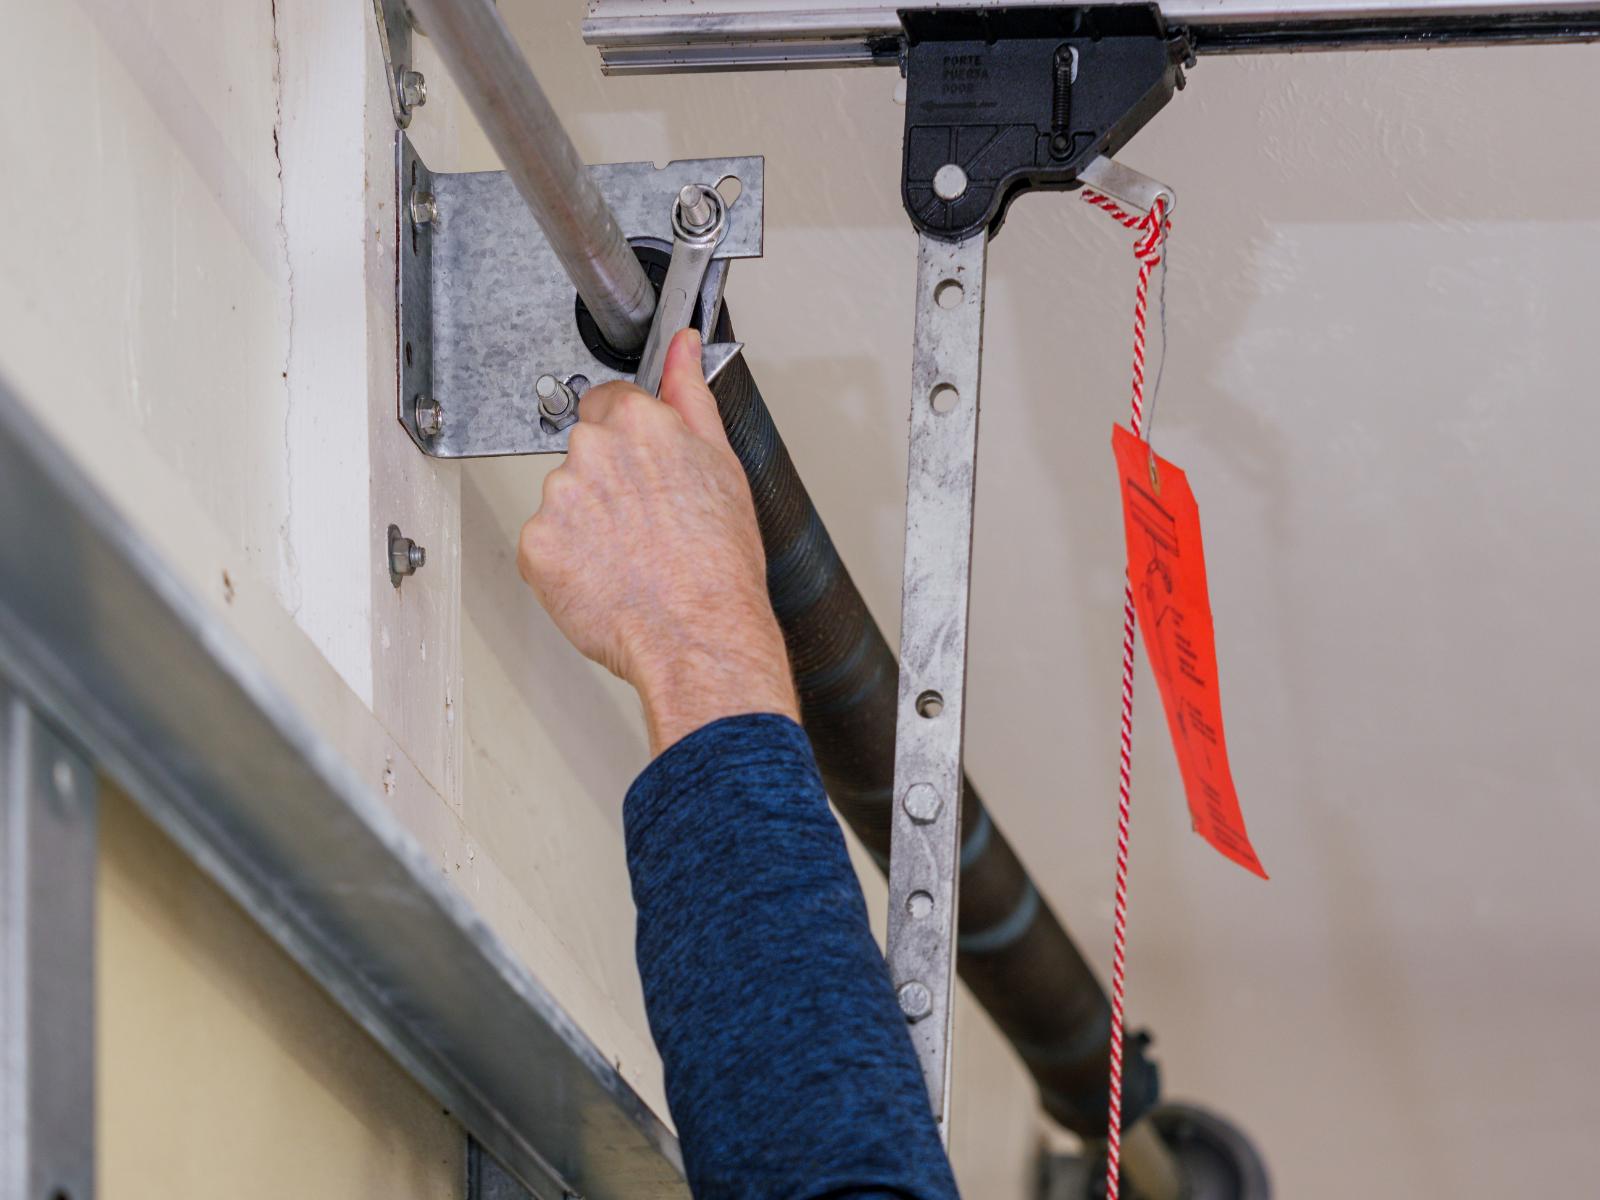
Adjust Spring Tension
Adjusting spring tension on your garage door is a critical task that requires a good understanding of the basics.
Always prioritize safety by wearing protective gear and ensuring the door is secure before making any adjustments.
While some minor adjustments can be done yourself, it’s recommended to seek professional help for more complex spring tension issues.
Spring Tension Basics
Maintain proper spring tension to ensure your garage door operates smoothly and efficiently. When it comes to spring tension basics, understanding how to adjust it yourself can save you time and money.
Here are some key steps to help you navigate this task effectively:
Identify the Spring Type: Determine whether your garage door uses extension springs or torsion springs, as each requires different adjustment techniques.
Locate the Adjustment Points: Find the adjustment collar or winding cone on the spring to begin the tension adjustment process.
Adjust the Tension Carefully: Use winding bars to turn the adjustment collar slowly and steadily, ensuring you don’t overtighten or loosen the spring excessively.
Test the Door Balance: After making adjustments, test the door balance by lifting it manually to check for smooth operation without any jerking or imbalance
Safety Precautions Advised
When working on adjusting spring tension for your garage door, prioritize safety by wearing protective eyewear and gloves to prevent any potential injuries. DIY techniques for adjusting spring tension require caution and attention to detail. Before starting, disconnect the power to the garage door opener to avoid any accidental activation.
Use winding bars specifically designed to adjust torsion springs to prevent injury. When releasing tension, do so gradually and with control to prevent the spring from unwinding too quickly. Safety tips also include ensuring the ladder is stable and positioned correctly before attempting any adjustments.
Maintenance advice for spring tension adjustments involves regular inspections to check for wear and tear. Look for any signs of rust or damage indicating the need for repair or replacement. When performing repair steps, always refer to the manufacturer’s guidelines for specific instructions.
Professional Help Recommended
To ensure the safety and proper handling of garage door components, it’s advisable to seek professional help for tasks involving adjusting spring tension.
When it comes to adjusting spring tension, the intricacies and potential dangers involved necessitate the expertise of a professional. Here’s why seeking professional assistance is recommended:
DIY vs professional: While DIY attempts may seem cost-effective initially, improper adjustment of spring tension can lead to severe accidents. Professionals have the knowledge and tools to make sure the task is done correctly.
Repair costs: Incorrectly adjusting spring tension can result in further damage to the garage door mechanism, leading to higher repair costs in the long run.
Safety first: Garage door springs are under high tension, and mishandling them can cause serious injuries. Professionals are trained to handle these components safely.
Precision and expertise: Professionals have the experience and skills to adjust spring tension accurately, ensuring the efficient functioning of your garage door while prioritizing safety.
Align Sensors
To ensure proper functioning, align your garage door sensors accurately to prevent any potential safety hazards. Proper sensor alignment guarantees that your garage door operates smoothly and without any unexpected interruptions. Here are some tips for troubleshooting and maintaining your garage door sensors:
| Sensor Alignment | Maintenance |
|---|---|
| Check sensor positions on both sides of the door | Keep sensors clean and free from debris |
| Verify sensors are facing each other directly | Inspect sensor wiring for any damages |
| Use a level to make sure sensors are aligned properly | Test sensors periodically for responsiveness |
| Adjust sensor brackets if necessary | Replace sensors if they are malfunctioning |
| Test the door after alignment for proper functioning | Lubricate moving parts for smooth operation |
Test Balance
Maintain the balance of your garage door by performing a simple test to uphold its proper operation and prevent potential issues. Proper balance guarantees that the door functions smoothly, reducing strain on the opener and prolonging the door’s lifespan. Here’s how you can conduct a balance test to keep your garage door in top shape:
Close the Door: Make sure the door is completely closed before starting the test. Disconnect the automatic opener by pulling the release handle.
Manual Lift: Lift the door manually to waist height and let go. A balanced door should stay in place. If it moves up or down, the balance might be off.
Check Springs: If the door doesn’t stay in place, the springs might need adjustment. Consult your owner’s manual for guidance, or consider calling a professional to handle spring adjustments safely.
Professional Inspection: If you’re unsure about the door’s balance or encounter difficulties during the test, it’s best to consult a professional. They can assess the balance accurately and recommend any necessary repairs to ensure your garage door operates smoothly and safely.
Regularly performing a balance test as part of your repair strategies can help detect issues early and prevent costly repairs down the line.
Replace Weatherstripping
Inspect the current weatherstripping on your garage door for signs of wear and damage. Weatherstripping plays an important role in keeping your garage protected from outside elements like rain, wind, and pests.
Over time, weatherstripping can become cracked, brittle, or loose, compromising its effectiveness. To maintain the integrity of your garage door, it’s essential to replace weatherstripping when necessary.
Start by purchasing replacement weatherstripping that matches the dimensions of your existing one. You can find weatherstripping at most hardware stores or home improvement centers.
Before removing the old weatherstripping, clean the surface where the new one will be installed. Use a mild detergent and water to remove any dirt or debris.
Carefully remove the old weatherstripping by peeling it off from the edges of the garage door. Take your time to make sure all remnants are cleared away before installing the new weatherstripping.
Begin attaching the new weatherstripping, starting from one corner and working your way around the door. Make sure it fits snugly against the door to create a proper seal.
Regularly inspecting and replacing weatherstripping as needed is a simple yet effective maintenance tip that can enhance the functionality and energy efficiency of your garage door.
Troubleshooting Common Issues
Identifying and addressing common issues with your garage door can help prevent larger problems down the line. Here are some troubleshooting tips to keep your garage door operating smoothly:
Remote Troubleshooting:
If your garage door remote isn’t working, start by checking the batteries. Replace them and try again. If that doesn’t work, make sure the antenna on the motor unit is hanging down and not damaged. You can also reprogram the remote to see if that resolves the issue.Motor Issues:
If your garage door is having trouble opening or closing, the motor might be the culprit. Check if the motor unit is receiving power and that the photo-eye sensors are aligned properly. Inspect the motor gear for any signs of wear and tear and lubricate it if necessary.Panel Repair:
Damaged panels not only affect the aesthetics of your garage door but can also lead to other issues. Minor dents can often be fixed using a rubber mallet, while larger damages might require panel replacement. Addressing panel issues promptly can prevent further structural damage.Weather Damage:
Exposure to harsh weather conditions can cause your garage door to warp or deteriorate over time. Inspect the weather stripping and seals for any signs of wear or damage. Replace them as needed to maintain a secure and weather-resistant garage door.
Summary
DIY strategies for garage door repair can save you time and money while ensuring the safety and functionality of your door.
Following the steps outlined in this article and staying proactive with maintenance and repairs, you can keep your garage door in top condition for years.